How to make an Egyptian crown
>How to make an Egyptian snake Crown.
How to make Cleopatra's crown.

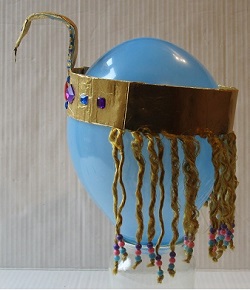
This is a simple tutorial on how to make an Egyptian crown. However I must apologise for the condition of the crown shown in the images. The reason for this being that my daughter wore it to an Egyptian fancy dress party before I had time to photograph it. When it was first made it looked a lot better.
In this tutorial, we'll be making a replica Egyptian snake crown as worn by Queen Cleopatra and other Egyptian royalty.
Parent supervision required !!.
For this simple project you will need:
A craft knife or Scissors.
Stiff card or corrugated cardboard.
Acrylic Jewels.
Metallic sequins.
Old sweet wrappers.
Gold foil.
Or Crayons ( or coloured pencils or pastels or paints).
A paint brush (if using paint).
PVA adhesive or sticky tape.
Glue spreader or glue stick.
Dressmakers tape measure.
If you want to add braids/hair as shown in the picture.
Pony beads.
Braided cord or you can buy a Cleopatra wig using the link provided.
Making an Egyptian crown: Getting started.
The first thing you will need to do is to make the headband.
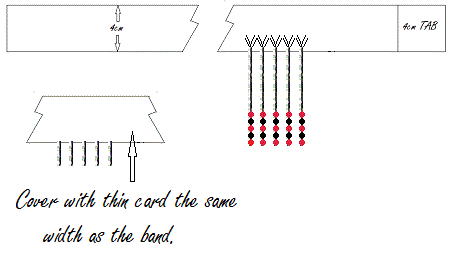
First measure around the head of the person you are making the crown for using the dressmaker's tape measure. If you do not have one, cut a long strip of paper and use it to measure around the head. A piece of string or cotton will also work. Once you have the correct size add approximately 4cm's to allow for a fixing tab. With that done take a piece of stiff or corrugated card approximately 4 cm's wide and cut it to the length required. DON'T forget to add at least 4 cm's to its length to allow you to join it together. As shown below.

How to make a Uraeus
With that done you're now ready to start making the uraeus. The Uraeus is the famous rearing Cobras head that signified the power and protection of kings.
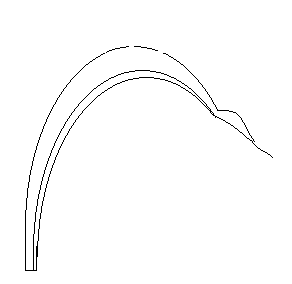
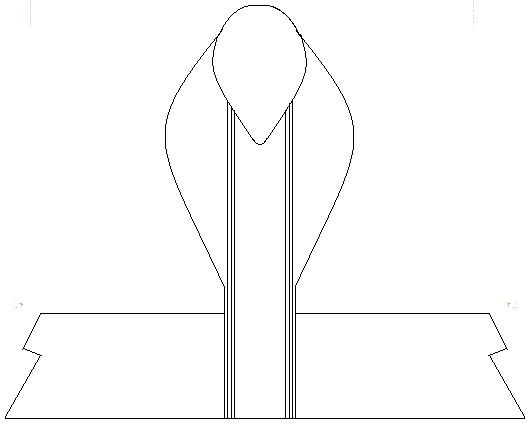
To do this you'll first need to make a series of templates that you will then stick together to create a 3D cobra's head effect. As I have shown below.
The first template will be the main template and will need to be approx 19 cm's to 20 cm's in length as this will include the 2.5 cm's wide x 4cm's long stem that connects the headband and the body shape of the rearing cobra or uraeus together. The cobras hood will need to be approximately 7.5 cm's at its widest point to allow for the snake's body to be created. By laminating a series of card supports together as shown, a 3D body shape will then be formed.
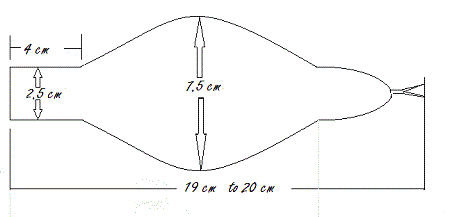
Each support piece needs to be the length of the original template, less the cobras head. As shown and with each support piece it is important to make it slightly narrower to create a 3D effect for the snake's body.
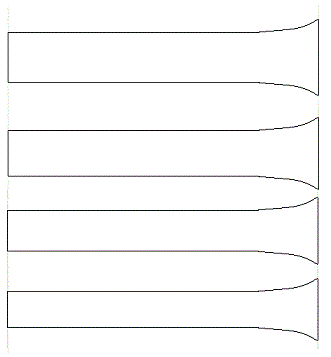
How to make an Egyptian Cobra crown.
Now you have your main components made you are ready to begin assembling your Egyptian crown. Begin by first sticking the body supports together with your glue stick or PVA adhesive. Once you have done this immediately stick it in place on your main template and then leave it to dry.
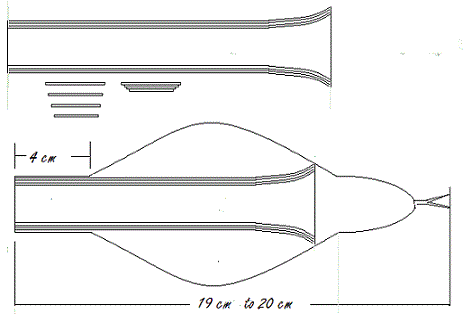
Once it has dried make the card slightly damp and then with a Pen or pencil start curving it. Do this from the base of the cobras hood to its head. Try to use the same sort of method that you would use to curl a piece of paper. If this method proves unsuccessful try curving it over a small drinks bottle or small jam jar. This should form the rearing cobra. Don't worry too much if the card supports flatten slightly at their ends as this will add to the 3D effect once you have decorated your Egyptian Queens crown.
With this done you are now ready to stick the cobras head to the headband ready for decoration as shown.
Egyptian crown decoration: Beaded braids.
With the crown now made you can start to decorate it. If you want to add hair like the one in the picture now is the time to do so.
Adding beaded braids, OPTIONAL: To add the braids you'll first need to cut your braided cord to the desired length. You can purchase the cord using the quick links to your left. It's important that you add these to the headband before you do anything else. This is because the stuck ends will need to be covered with a thin piece of card the same width and length as the headband prior to proceeding with decorating the crown. Before fixing them to the headband you can add Pony beads. Add the beads by fraying the ends of the cord and then threading them onto a needle before sliding them up the cord. When you have put enough beads on to the braid, you can use as many as you like, tie a knot, in the end, to stop them falling off.
Embellishing a fancy dress crown.
With this done you're now ready to decorate the crown. I used gold metallic paper foil to first cover my crown to give it that regal look. However you can also use gold acrylic paint if you wish.
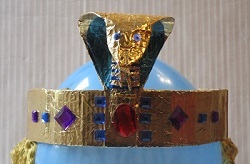
Once I had completely covered the crown in the gold foil paper I then added some detail to the Cobra head by using some saved up blue foil sweet wrappers that I cut into thin strips to decorate the snake's body. As can be seen in the pictures at the start of this tutorial.
To decorate the bluish tint on the underside of the Cobras hood I used some transparent blue sweet wrappers that gave it a translucent gold effect. Once this was completed I applied some acrylic jewels to the headband and a couple of metallic blue sequins to the snakes head for eyes. You can use whatever you like to decorate your crown so let your imagination run wild and enjoy your Egyptian crown fit for a queen. With all the decorating done you can now place it on the head of your Egyptian queen or princess and fix the headband in place using PVA, sellotape or staple or 2 but make sure that you cover the ends of the staples with a thin piece of card so they cannot scratch your head or prick your skin.