Bomb shelter lighting.
How to add a light to a model WWII Anderson Shelter.
How to wire up the light for a WWII Anderson Shelter.
In this 5th part of the craft project on how to make a realistic miniature version of a WWII bomb Shelter we will now be learning how to add bomb shelter lighting as you now wire up your light.
Parent supervision required !!.
For this simple project you will need:
2 x AAA
A battery pack which I will show you how to make
4 fold out paper spilt pins.
1 of old dried up Berol coloured pen or pen of similar size.
1 of candle
PVA adhesive or sticky tape
1 sheet of A4 paper
Glue spreader or glue stick
A soldering iron or glue gun.
Stage 11 Shelter lighting: Making a battery pack.
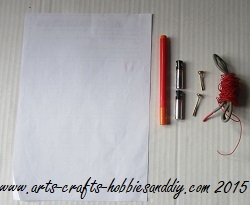
To make the battery pack you will need the components shown above.
1 x sheet of A4.
1 x old ink pen or similar.
2 x AAA batteries.
1 long length of thin wire.
2 x paper split pins.
1 x long length of thin wire.
Abrasive paper/nail file.
Stage: 1
The first thing to do to start adding the bomb shelter lighting is to place a sheet of A4 paper onto a flat surface.
Then take a pen and place it against one of the long edges.
Move it up to the end of the sheet of paper and then mark its length.
Now do the same at the other end. Join the marks together with a ruler and then cut your sheet of A4 paper along it's full length to the length of the pen, as shown in the example below.
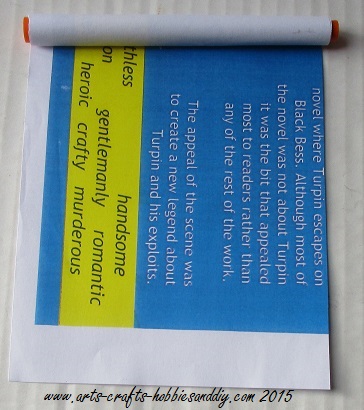
Making a paper tube.
Hint: Before gluing, place your pen on the paper and begin rolling it until the edge of the paper touches the rest of the sheet.
Mark this point and then from the mark apply the glue to the rest of the paper.
This will ensure that the pen does not stick to the paper. Another way is to apply a thin layer of talc to the pen prior to rolling up your tube.
With the paper cut, you'll now need to apply a thin layer of glue to the whole side of the sheet that you will place your pen on. Begin tightly rolling it up on the shaft of the pen making sure that the paper edges line up. Keep doing until all the paper is in contact with the tube.
When you have finished you should have an evenly wrapped tube with near flush ends.
Leave the tube to dry and then remove the pen.
With that done you should now have a rigid tube.

How to make simple battery terminals.
While waiting for the tube to dry begin making the battery terminals for the bomb shelter lighting like the one shown in the picture.
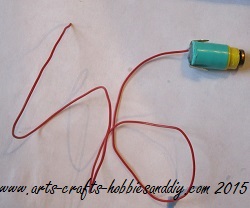
To make the battery terminals you'll need to remove the lid from your pen. Making sure of course, you do not get any excess ink over yourself or anywhere else. It might be wise just to rinse it out before you use it just to be safe.
To make your battery pack terminals, first push a hole in the centre of the solid end of your pen top. It will need to be just big enough to push your wire through as shown.
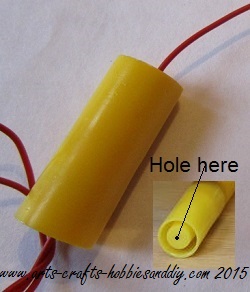
Next, connect a split pin paper fastener to the end of the wire that exits the solid end of the pen top.
Spread the split pin paper fastener legs and gently score one of the surfaces with some abrasive paper. This will make a key for your solder or glue.
Gently hold the wire in place and fix it as shown either by soldering it or gluing it with a glue gun.
Note: If you are a child you will need an adult to do this. Both soldering irons and glue guns are hot and will burn if not used correctly.
When using a glue gun be sure to get a good contact with the paper fastener before applying the glue. I suggest wrapping the wire around the leg of the fastener a few times to achieve this.
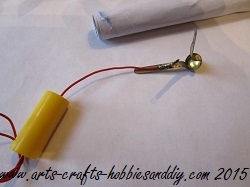
Lining up the wires.
Once you have the wire fixed firmly in place press the two clips back together on the paper fastener. Also make sure that the wire runs down the centre of the two legs on the fastener as shown below.
Push the points through the hole in the pen top until the cap of the fastener touches the pen top. You may need to make the hole slightly bigger but try not to make it too big as a snug fit is better.
With that done open the two legs out inside the pen top to secure the paper fastener.
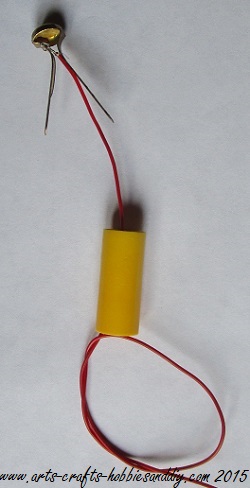
To make the other end carefully cut the end off of the pen at about the same length as the pen top. Shown below. Use either a craft knife or fine saw to do this.
Note: If you are a child you must get an adult to help you. Craft knives and saws are dangerous and can hurt you.
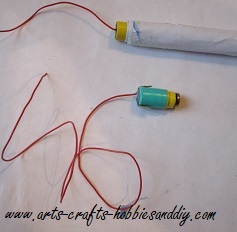
Repeat the process as before, putting a hole through the solid end to enable a wire to pass through it.
You will notice on the image above that the legs on my paper fastener were too long so I folded them out and down the sides of my end terminal. This will help to hold it in place. To help hold the wire and split pin fastener in place I then carefully filled both end caps with wax using the candle as shown below.
Note If you are a child you will need an adult to do this as hot wax and fire are both very dangerous and will burn.:
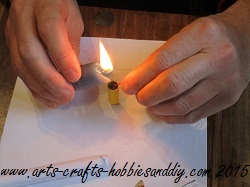
Sealing the terminals using wax.
Carefully light the candle and allow the melted wax to drip into the pen tops until they are full then leave to cool down slightly and gently press the soft wax into the pen top to ensure that it seals as shown below.
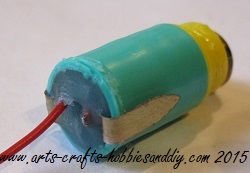
With this done insert one of your terminals into the end of your paper tube. If it is not a snug fit wrap a piece of sticky tape around it and try again.
Adding batteries to the battery pack.
When you have it fixed firmly in place insert your AAA batteries making sure that you have the positive and negative terminals the right way up.
i.e. the negative on the battery is in contact with the terminal and the positive on the battery is in contact with the negative on the second battery as shown.

Once you have done this you can insert the other terminal.
To make a circuit and see if you have all the contacts the correct way around connect up your light bulb and see if the bulb lights. If it does not light, recheck you contact points and try again.
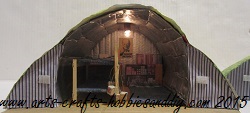
If you have successfully lit your bulb you are now ready to move on to fitting the battery pack into your model.
Stage 12 Shelter lighting : Fitting a battery pack into a model.
To fit the battery pack for your bomb shelter lighting you will first need to turn the model over so that you can get to the base.
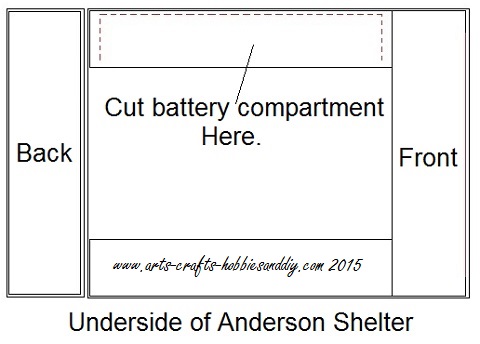
Mark out your battery compartment as shown with the dotted line making sure you don't overlap the floor of your Anderson shelter and that it is no wider than your side piece.
Remember to only cut three sides as the side without the dotted line is where you will fold it open.
With the battery compartment cut out, fold it back to expose the support strut as shown.
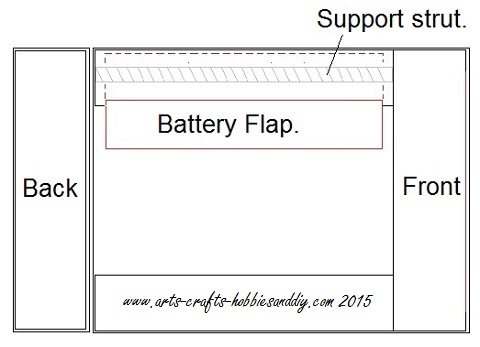
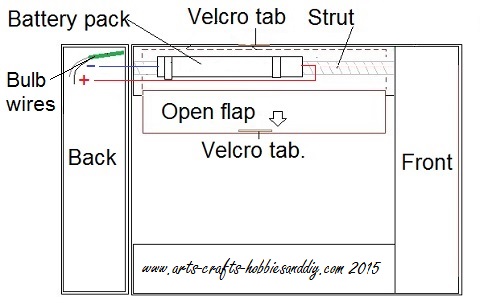
Take the bomb shelter lighting battery pack and secure it firmly to the support strut.
If you cannot do this, secure it where you can. You will also notice that I have added a Velcro tab so that I can close my battery compartment and secure it.
Stage 2:
The next thing to do is to make the circuit by making a simple switch as I have shown below. You can do this using stiff card to mount your switch terminals at a paper clips length apart as shown. When bending the paper fasteners over on the back make sure terminals do not touch each other.
Shelter lighting: How to make a simple switch for modelling.
To secure them in place glue a second layer of card over them then stuck the switch unit to my model.
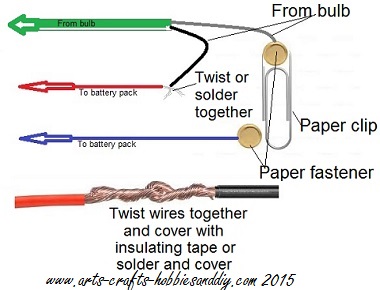
Place your switch anywhere you want it.
Either hidden, at the end of your model or in full view on the surface.
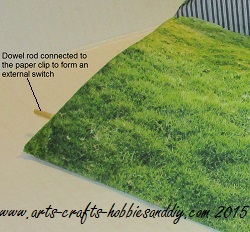
I connected a piece of dowel to my paper clip so that I could have the switch on the outside of my model, see below
