How to make a pyramid.
How to make the Musée du Louvre, Louvre art gallery Paris
or an Egyptian pyramid.
About The Louvre
Inside Louvre Museum Paris, Mona Lisa - (Part 1) 🇫🇷 France - 4K Walking Tour
How to make a model Louvre gallery.
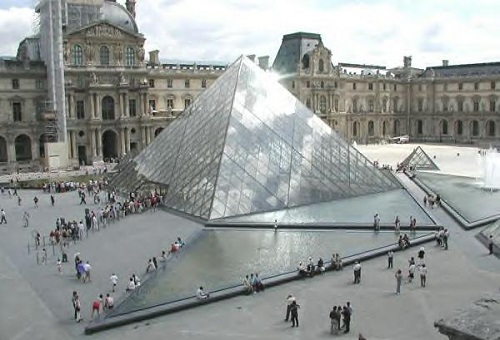 In this craft project, you will be making a realistic miniature version of the Louvre museum in Paris or an Egyptian pyramid. This is a great little project on how to make a pyramid which requires the minimum amount of materials. Its very easy and ideal for a school art project either on France's art and culture or the Louvre art gallery. However there is a lot of marking out and cutting out to do, which may take time. You will be using scissors or a craft knife so it may require adult supervision.
Parent supervision required !!.
For this simple project you will need:
Cardboard or stiff paper
Set square or right angle
Ruler
HB Pencil
Paint
A paint brush
PVA adhesive or sticky tape
Glue spreader or glue stick
To make your Louvre pyramid you will first have to make a triangular template.
To do this you will need to get a piece of cardboard or stiff paper and draw an equilateral triangle. An equilateral triangle is a triangle with three sides of equal length. You do not have to start with a template however, I find by using a template its easier to mark out the pyramid. As unless you are good at measuring accurately you may find that the pyramid does not turn out correctly. Mostly because the slightest error in line length will make the pyramid out of shape.
How to make a pyramid, stage 1: Making the triangle template.
Begin the template by first drawing a baseline the exact length that you want the side of your pyramid to be. As we are making the Louvre Paris, pyramid, I am going to make my baseline 18cms long. This is due to the fact that the Louvre pyramid has eighteen panes of glass along its base and up each side.
These are then divided into three sections. Each section contains six panels that form three half diamonds along its base and three full diamonds to its apex (top). Therefore my triangle will need to be 18cms x 18cms x 18cms. You'll need to use your ruler to do this as once you've drawn your baseline you'll also need to find the middle of it.
With the middle found, place a set square or right angle on the mark. Always make sure it sits exactly on the baseline. Draw a vertical line at 90 degrees to the baseline. If you have done this correctly you should have what looks like an upside down triangle.
Its important that the vertical lines exactly 90 degrees or you will not be able to measure your sides accurately.
 The next thing to do is Measure from each end of the baseline up the centre line, to the point where the measurements the same length as the baseline. If the centre lines correct the measurements should be the same on all three sides of the equilateral triangle. That being the case you are now ready to move on to the next stage. If they do not line up check the centre line and measurements for accuracy.
Stage 2: Cutting out a triangle template.
Once you have the template drawn you will need to carefully cut it out. You can do this with a craft knife or scissors. If you're using a craft knife you'll also need a ruler to ensure that you cut a straight line. Always get an adult to help you when using scissors or craft knives.
Once the templates ready get another larger piece of card or stiff paper and start marking out the four sides of the pyramid. I am using an A3 sheet of card as it will be just large enough for my pyramid.
Place the triangle on the card or stiff paper making sure that its far enough in from the edge to enable you to add fixing tabs. Try to keep it as close to the edge as you can. By doing so it will also ensure that you can get all the other sides of the pyramid to fit on the sheet. Continue to mark out the pyramid ensuring that you always place the edge of the template against the edge of the triangle that you have already drawn. Repeat this until you have a shape that resembles the one below.
Remember also to allow enough room around the edge of the template to add fixing tabs. You will need these to fix your pyramid to a base so that it is rigid. You ll also need to add a tab to one side of your last triangle so that you can join your pyramid together. As can be seen below.
Stage 3: Cutting out the pyramid template.
Once you are happy with the pyramid template you can cut it out.
Be careful when you do this as you do not want to cut the fixing tabs off, you will need to concentrate. (Remember always ask an adult for help when using scissors or craft knives).
When you have cut out the pyramid template you will need to lightly score down all the lines on the template using your scissors. (Remember always ask an adult for help when using scissors or knives). This will make it easier to bend the card or stiff paper into shape.
When scoring lines, first place a ruler on the edge of the line and then lightly run the point of the scissors along the edge of the ruler. Apply gentle pressure so as to leave a small indent in the card or stiff paper. Always make sure that you place another piece of board or stiff card between your template and the surface you are scoring it on. Make sure it overlaps enough to prevent damaging the surface below. Failure to do so can result in irreparable damage to your work surfaces. I always use a thin piece of plyboard or timber sheeting.
Making the base.
Stage 4: Making your pyramid base.
Once the pyramid templates cut out you are ready to make a base. To make the base you will first need a piece of card large enough to mark out a square with four equal sides that are at least the same length as the sides of your pyramid. For my pyramid, I will make a square 19 cms x 19 cms x 19 cms x 19 cms. This is because the sides of my pyramid are 18 cms long. Making them slightly bigger will allow me to place my pyramid firmly on the base and make sure that all four sides are in full contact with it. If you are making a larger model with other objects involved then your base can be as big as you require.

Once you've made the base also make a smaller square about 5cms x 5cms. Depending of course on the overall size of the pyramid. Make sure when you make this square that you leave tabs on all sides as you will need these to enable you to stick the square inside the pyramid. This smaller square will be used to add strength to the pyramid and to help form its shape before adding it to a base. With your scissors lightly score along the lines so that you can fold your tabs.
Remember always ask an adult for help when using scissors or craft knives.
Stage 5: Painting your model pyramid.
Now that I have all my parts made I could begin to glue them together However, I always prefer to paint them first as I find it easier to do this while the pyramid is still in a two-dimensional form (flat). Once the Pyramids assembled it is difficult to mark out the details accurately.
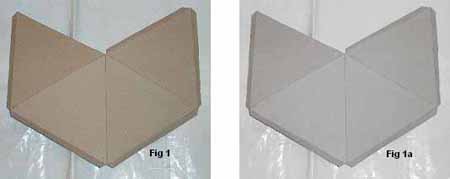
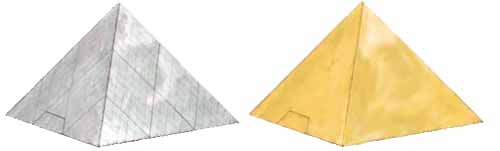
As I'm making the Louvre pyramid I will first paint my template (Fig 1) a very light grey to create the background colour. To do this I will first add some white paint to a clean container. Then using the tip of my paintbrush l will slowly add in some black paint, mixing it all the time until l get the colour I desire.
As I am looking for a very light grey I have only added a tiny amount of black. You may need to repaint your pyramid depending on how well your first coat looks when dry. (Fig 1a)
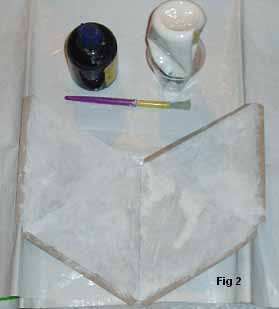
Once I was happy with my light grey background, I then dabbed patch's of white paint onto it with my brush. These will form the reflections of the sky. Before the white paint was dry I then used clear water to diffuse the white and create a translucent wash. Using my brush in a gentle swirling and side to side motion I mixed the clear water into the white paint letting it fuse together forming the reflection of the sky on the sides of my pyramid. Fig 2
 If you are making an Egyptian pyramid you can paint the template as shown below
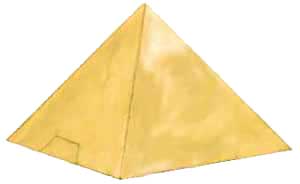 Using light browns, yellows, and white to create your stone effect. Make sure you blend all your colours together to create a natural weathered look. The best way to do this is with a damp piece of sponge or cotton wool.
Stage 6: Marking out the Louvre details.
 The next thing to do is to mark out the panes of glass that form the pyramid. I know that there are eighteen small panes of glass along the base on each side of the Louvre pyramid and as it is an equilateral triangle there are also eighteen panes of glass running up each side of the building. Together they form three full diamond-shaped panes. Each pane contains thirty-six smaller panes of glass. There are three half diamond shaped panes along the pyramid base each containing eighteen smaller panes of glass. Together they form one side of the pyramid.
With this in mind, I will need to mark out all three sides of each triangle into eighteen sections, each being 1cm apart. This is why I made my pyramid 18cms x 18cms.
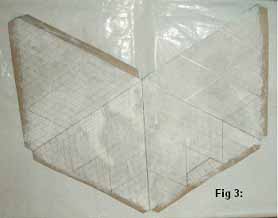
To do this I will use a sharp HB pencil. Once this is done I can also use my sharp HB pencil to begin joining the marks together. I made sure that I started at the base and joined each matching mark up the sides of the triangle together to form small diamond-shaped panes. see Fig 3 and Fig 4 below.
This takes a long time and a lot of concentration. With that said, if you find your struggling try taking a break and come back to it later.
lining the larger panes.
Once you have finished marking out your small diamond-shaped panes you can then begin to line in the larger diamonds that they make up. To do this count six panes along the base and six panes up the side. Then draw a slightly heavier line. Now count another six panes along the base and another six panes up the side and again join the points together using a slightly heavier line. I used a silver Gel pen for this but you can use whatever takes your fancy. Continue to do this until you have marked out all of your larger panes.
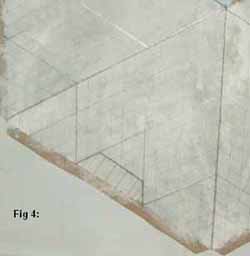 With that complete, you will next have to mark out the door. To do this choose the side that you want the door to go on. Using the middle half large diamond pane, count up two diamonds on each side and draw a line between the two points. With this done lightly rub out the existing smaller diamonds. Then draw four vertical lines from the base up to the centre of each smaller diamond. To form the separate door panels, See Fig 4 above.
Stage 7: Assembling your model pyramid.
You are now ready to begin assembling your Louvre pyramid.
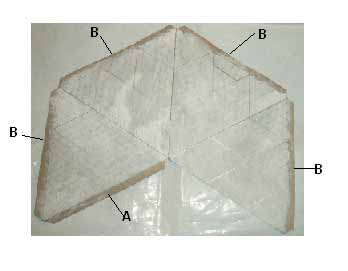
The first thing you will need to do is carefully fold the tab marked (A) in at 90 degrees. Then add a thin layer of glue to tab (A) and bring the other side of your pyramid around to meet it. Make sure that you carefully fold down the lines that you scored earlier until the two sides meet. If you are doing this correctly you will begin to form your initial pyramid shape. Once you have lined up your two sides place a piece of sticky tape on the back of tab (A) on the inside of your pyramid. This will help to hold them in place while the glue dries. Now leave this to dry.
Once it has dried you are ready to insert your smaller square that you made earlier.
Fold each tab down at 90 degrees and then place a thin layer of glue on each tab. Take your pyramid and form it into the correct shape so that the base looks like a square. Then carefully place your smaller square inside the pyramid with the tabs facing the pyramid base. You'll need to bend the tabs up slightly to meet the sides of the pyramid as you push the square as far into the pyramid as you can. Its also important to make sure that all the tabs are fully touching the sides of the pyramid. Put a piece of sticky tape on each tab to hold it in place. This will form the correct shape for the pyramid. Wait for it to dry and then move on to the next stage.
Stage 8: Adding the base.
Once the main pyramids complete you can then stick the pyramid to its base. Fold all the tabs in around the base of the pyramid so that when you press your pyramid down onto its base they are all in full contact with the base. Add a thin layer of glue to each tab (B) and then gently press and hold your pyramid down. Also make sure that the bottom of your pyramid is in full contact with the base. All the tabs should be concealed inside the base. You may need to rest a bit of weight against each side of your pyramid until it is dry.
You have now completed your Louvre Pyramid.
