How to make a model WWII Anderson Shelter-Air raid shelter.
How to make an Anderson Shelter.
PT1 go to PT2 - PT3 - PT4 - PT5
In this 5 part craft project, you will be making a realistic miniature version of a WWII Anderson Shelter like the ones used during the Battle of Britain and shown in the pictures below. This is a great little project which requires the minimum amount of materials. It is very easy and would be ideal for a school project as it falls within the national curriculum, It is quite complicated as there is some marking out and cutting out to do, which may take little time.

Parent supervision required !!.
For this simple project you will need:
A large tin or other cylindrical container.
A stiff corrugated cardboard box, e.g. A family size crisps box.
2 Rubber bands.
Ruler
A craft knife or Scissors
Pencil or pen
Paint
A paint brush
PVA adhesive or sticky tape
Clothes Pegs
Glue spreader or glue stick
Stage 1:Forming the shelter.
To make the Anderson Shelter you will first have to make a rectangular template to the desired length of the shelter. This can be based on the size of the cylinder you are using to form the shelter. For example a Baked beans tin. A baby milk container or any other cylindrical object you choose.
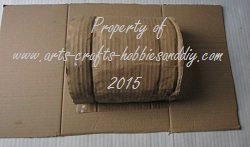
You will then need to make it slightly damp, Not wet as the corrugated card will separate and turn to mush.
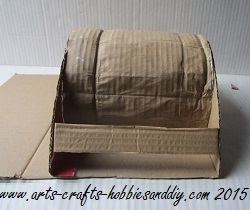
Once you have dampened the card, carefully wrap it around your cylinder and fasten it with the 2 rubber bands as shown in the pictures.

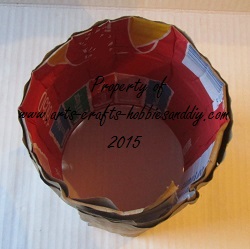
Once you have done this leave your cylinder somewhere warm to dry and take shape. Once it is dry take off the rubber bands and remove the cylinder.
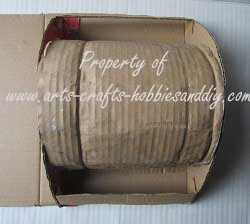
You should now have a cardboard cylinder as shown in the picture.
 Once your cardboard cylinder is dry you are ready to form the main part of your shelter.
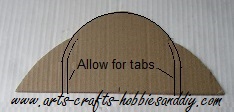
You will first need to carefully open up the cylinder to form a U shape. Allowing enough to form the sides of your shelter, carefully fold up the excess cardboard on each side and remove accordingly as shown below. Before cutting make sure you have allowed enough card to form the tabs on the base of the shelter as these will be used to glue it to your base using PVA adhesive.
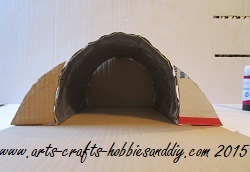
 The next thing to do is to paint the inside of the card with silver paint or you can find a suitable image of some corrugated iron online and print it onto a full size sheet of A4 paper as shown below.
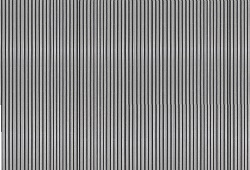 You will need to carefully stick it to the inside of the shelter making sure you have the lines of the corrugations running vertically from the tabs. That is running from tab to tab. Hint: To save ink before you print the whole sheet, do a small test panel to see if you have the correct scale for your model. Once you have done this you are ready to stick the main part of your shelter onto a base.
Stage 2: Making a base.
You will now need to cut a piece of card large enough to make your base as this is what you will build upon to make your Anderson shelter.
As shown in the picture below I used the side of my family size crisps box to make the base, allowing enough card each side to form the sloping sides. You will need to use a piece of card that is of a suitable size for your initial shelter.
 Tip: To hold my shelter in place while the PVA glue dried I used 4 small pieces of double sided sticky tape placed just inside each corner. You may notice in the picture that I also stuck my bomb shelter in line with the factory fold on the cardboard base. This was to enable it to fold up to form the back of my bomb shelter as shown in the pictures below.
To form the back of the Anderson/Battle of Britain air raid shelter you will need to place the flap as shown below, or a separate piece of card against the back of the shelter and carefully draw around it.
If you are using the flap as shown in the picture make sure you allow for a tab at the top to fix it in place. If you are using a separate piece of card as shown in Fig 3 you can add an extra tab to the base of your template to allow you to stick it onto the base. You will also notice that in Fig 2 and Fig 3, which is the separate back piece I have allowed for the sloping sides that will form the banks of grass against the shelter and will be replicated at the front of the shelter in stage 3.
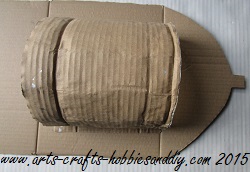
Fig 2: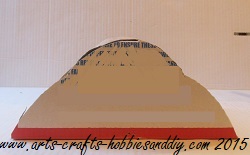
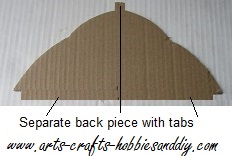 Fig3:
Fig3:
Stage 3: The sides.
Once you have the back piece fixed and the initial shape of the bomb shelter you are now ready to make the shape of the front to match the back.
Take another piece of card large enough to match the back of the shelter and place it against the model making sure the bottom edge is flush with the cardboard base.
Using the model as a template draw around it so that you have an identical shape to the back on the piece of card. 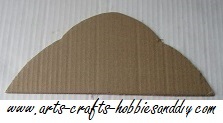
Carefully cut out the shape and then place it against the front of your bomb shelter making sure that the curve is lined up properly with the curve of the shelter.
Next draw around the shelter so that you now have the shape of it replicated on the card as shown below.
 Measure in from each line approximately 1cm as shown above as this will form the tabs that will enable you to fix it to the sides of the air raid shelter.
Next carefully cut the sides out making sure you cut on the inside line. Be careful when you do this as you do not want to cut the tabs off, you will need to concentrate. (Remember always ask an adult for help when using scissors or craft knives).
When you have cut out the side templates you will need to carefully cut the tabs at about 1cm intervals making sure you do not cut past the other line forming the shape of the Anderson shelter as shown. To form tabs, Score down the lines on the template using the back of the scissors. (Remember always ask an adult for help when using scissors or knives). This will make it easier to bend the tabs into shape. See the example below.
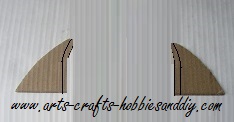
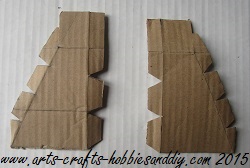 As shown in the examples, I have cut the corners on each tab. This will make it easier to form the shape of the shelter and to stick them in place, as, if you leave the tabs without trimming them they will overlap and make it difficult to get a good flush joint.
Note: The above image is only showing examples, not the actual pieces you are making so you will only need to cut the tabs on the edge that will fix to the shelter.
Once you have done this use your PVA or sticky tape to fix your sides to your Anderson shelter as shown below. You can use pegs to hold them in place if you need too.
Once you have the sides in place the next thing to do is to reinforce them by adding a cardboard brace. To do this measure the distance between the two ends and then add 2cms to allow for a tab 1cm long at each end. The width of the brace does not matter as long as it fits flush to the edges of the curves on your sides. Bend over the tabs and glue the brace into place. Do this to both sides of your bomb shelter as shown in the picture.
Note: You can add more than one brace if you wish, for example you could place one at the base. One in the middle and one at the top, it's entirely up to you.
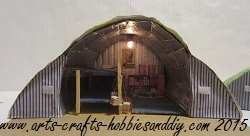
Stage 4: Adding a light. (optional)
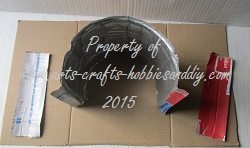
Once you have the basic Anderson air raid shelter you are now ready to add a light if you wish. To do this you will need.
1 torch bulb.
1 length of 2 core wire as shown or a long length of single wire.
A soldering Iron.
Some Solder.
Insulating tape
To add a light puncture a small hole in the top of the shelter where you want it to be.
Important: Adult supervision required as solder irons WILL burn. If you do not have a soldering iron then perhaps a glue gun would do the same job. Just try to make sure you have a good contact point on the bulb before applying the glue.
Take your bulb, wire and tape.
Firstly strip the wire and fix it to the bulb as shown either with solder or a glue gun.
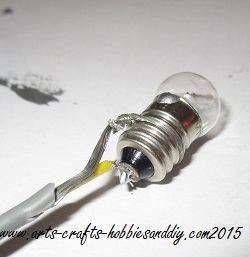 To securely fix the wire to the shaft of your bulb place a piece of insulating tape around it. (not shown) This will also make it look more effective when you add it to the shelter. To add the light simply thread the wire through the hole you made in the top of your shelter and pull it through until your bulb just touch the card.
Next, you will need to lay the wire across the outside edge of the shelter and toward the back. Then secure it in place with a paper strip as shown. 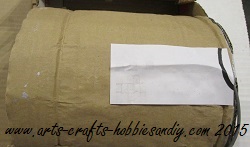
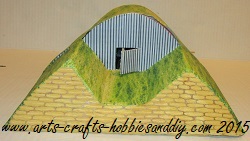
Stage 5: Adding the side slopes
Now that you have your basic Anderson shelter frame you are now ready to add the sloping sides.
To do this lay a length of corrugated cardboard along each side making sure it is large enough to cover the open sides that you have created and that it meets the original curved cylinder with at least an extra 1cm to allow for it to be fixed firmly in place. Also allow 1cm at the other end to secure it to the base.
Hint: When placing the card on the sides use the corrugations in the cardboard to your advantage by making sure the corrugations run the length of your shelter as it will make it much easier to shape your sides.
With the card correctly positioned draw up the sides and across the top and bottom and then add 1cm at each end as mentioned. Then cut it out.
Note: Before you fix one side thread the wire down the back edge of the shelter and into one of the sides as shown in the picture as this will become your battery and switch compartment for your light.
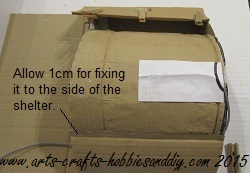 Fig 1
Fig 1
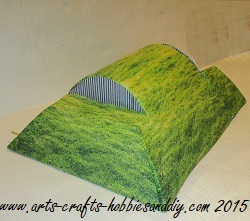
To fix the sides first glue the base tab to the base of the shelter. Next. apply a layer of glue to the cardboard brace and firstly fix the card to the brace using pegs as shown. This will ensure that you have good contact with the brace to reinforce your shelter. Also, apply glue to the edges of the front and back pieces that you made earlier.
Once it has dried firmly to the brace apply a layer of glue to the other tab and fix it to the side of the shelter as shown in Fig 1 above.