Model Skyscraper
How to make a Model Skyscraper.
How to build a cardboard model Skyscraper.
In this craft project, you will be making a skyscraper.
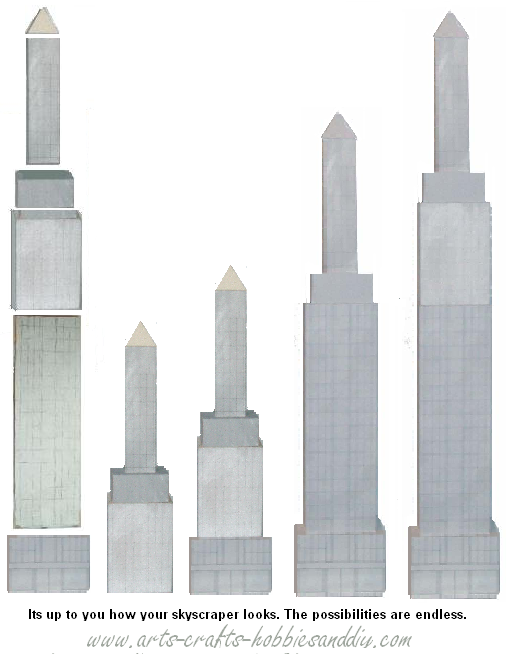
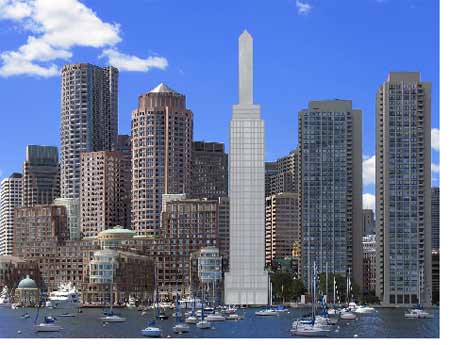
It is simple to make and does not necessarily have to look like the one in the example. It is made using ordinary cardboard boxes of various shapes and sizes so it can be constructed any way you like and would be ideal for any Ks2 - Ks3 school art project, or for you to make an imaginary city by making several of them.
There's a lot of marking out and cutting out to do, which is quite complicated and may take a little time.
NB: You will be using scissors or a craft knife so it may require adult supervision.
Parental supervision required !!.
For this simple project you will need:
A craft knife or Scissors
A selection of cardboard boxes.
Set square or right angle
Ruler
HB Pencil
Crayons ( or coloured pencils or pastels or paints)
A paint brush (if using paint )
PVA adhesive or sticky tape
Glue spreader or glue stick
Constructing the Skyscraper.
To make Skythescraper you will first need to gather a collection of cardboard boxes. There are so many different types of cardboard boxes and they come in all shapes and sizes, such as cereal boxes, cookies, chips, and everyday food items so the possibilities for the skyscraper are limitless.
Hint: Try placing different types of boxes on top of each other first to see how the Skyscraper might look.
Stage 1: Preparing the boxes.
Once you have decided which boxes you are going to use you will first need to take them apart.
Taking them apart is optional but I have found that some types of packaging are very hard to paint. This is because they have a shiny or smooth glossy finish that does not accept paint or other colour mediums such as crayons, markers or coloured pencils very well. This results in the colour's rubbing off when the models dry. By reversing the box you will have a clean matte surface that makes them easy to colour and prevents the colour from coming off in most cases.
How to dissasemble a cardboard box.
To disassemble a cardboard box you will first need to open the two factory ends of the box so as to enable you to flatten the box. These are the ends that are used to open the box. When these are open it enables you to flatten the box out. The next thing to do is to look inside the box and find where the box is joined together. You should be able to see a long tab inside the box that joins the sides together.
Carefully separate the join trying not to rip the box as you do so.
Hint: Use the edge of a ruler or blunt dinner knife to help separate the edges.
You could try lightly dabbing the join with a warm damp cloth but in most cases, I have found this method to be unsuccessful as the card becomes too soft to separate properly and tends to tear more easily. If you do damage the box slightly don't worry as you can always cover the damage with a piece of plain paper or card should you wish too.
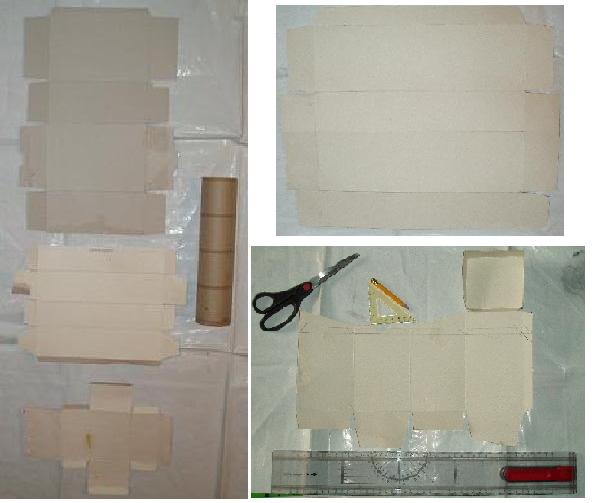
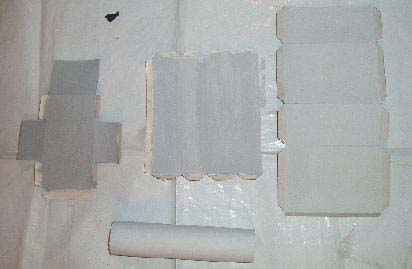
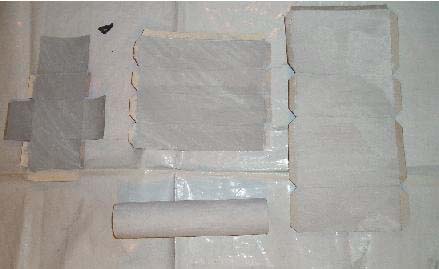
I have chosen five boxes of various sizes and a kitchen roll insert.
Stage 2: Marking out the boxes.
Once you have reversed the boxes lay them flat and mark out tabs on each end.
Mark out your tabs on the card that formed the ends of your boxes as shown below. These will be used for fixing your top and bottom pieces or side pieces depending on how you position the box. ( see Tops bottoms and sides below.)
By doing this you will be able to provide a clean flat surface to join your boxes together or a flat side for you to paint and add your detail on your model Skyscraper.
How to mark out the tabs:
To mark out your tabs you will need to use your set square and ruler.
Start by placing your set square on the fold line that is already on the card. Then draw a line at 45 degrees as shown below.
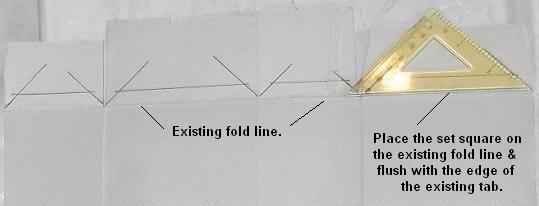
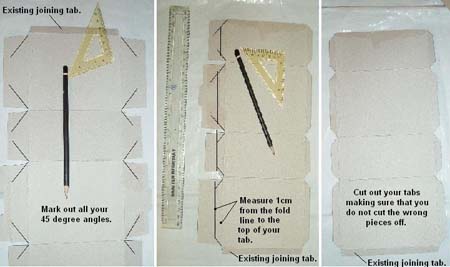
Once this is done use the ruler to measure up 1cm from the fold line at each end of the tab and join your two points together. When you have done this all around the box you are ready to cut out the tabs. Take some scissors or a craft knife and carefully cut around the lines you have marked out making sure that you do not cut off the existing joining tab that was holding the box together.
Remember always ask an adult for help when using scissors or craft knives.
Stage 3: Tops, bottoms or sides.
Tops and Bottoms:
The next thing to do is to make the tops, bottoms and sides for each of the boxes.
This will ensure that the boxes stay in shape and also provide a good surface for you to stick to or decorate with a design.
To do this you will first need to measure the four sides of the open end of the box that you are working on. Using your set square transfer the measurements to a piece of card and draw the shape that you need. You will need to measure both the long sides and the short sides and transfer these measurements to the tops or bottoms.
I will concentrate on the box above which when complete will form a rectangle.
The open ends have two long sides that are 99mm in length and two short sides that are 63mm in length. This means that I will have to make a rectangle to fit on each open end of my box with sides of 99mm x 63mm. These will form the top and bottom or sides depending on how you position your box.

Once you have done this for all the boxes you are going to use you will have the basic components for your skyscraper and are ready to move on to colouring it.
Stage 4: Colouring your Skyscraper.
Now that I have most of my parts made I could begin to glue them together, but I always prefer to paint them first as I find it easier to do this while the model Skyscraper is still in a two-dimensional form (flat), as once it is assembled it is difficult to measure and mark out the details accurately.
I have chosen to use paint and as I am making a glass Skyscraper I will first paint my boxes a very light grey to create the background colour. To do this I will first add some white paint to a clean container. Then using the tip of my paintbrush I will slowly add in some black paint, mixing it all the time until l get the colour I desire. Make sure you clean your brush properly before dipping it back into the black paint or you could contaminate the paint with grey.
As I am looking for a very light grey I have only added a tiny amount of black. You may need to repaint your model Skyscraper depending on how good your first coat looks when dry.
Hint: Old yoghurt pots are great for mixing your paint in as they can be covered with food wrap/cling film to keep the paint fresh long enough to finish your model. Two coats of paint are best so make sure you mix enough to paint all your boxes twice. If you do not use two coats you can use the leftover paint for touching up your model skyscraper when you have finished building it.
Once I was happy with my light grey background I then dabbed patch's of white paint onto it with my brush to form the reflections of the sky on the glass sides of the Skyscraper. Before the white paint was dry I then used clear water to diffuse the white and create a translucent wash.
To do this I used my brush in a gentle swirling and side to side motion I mixed the clear water into the white paint letting it fuse together forming the reflection of the sky on the sides of my Skyscraper. You can also see an example of this technique in How to make a pyramid. Once you have done this leave them to dry before continuing.
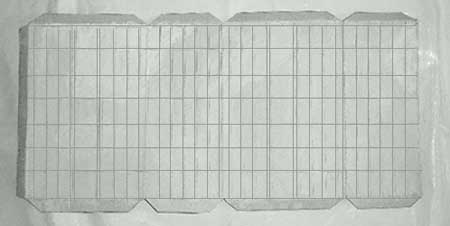
The next thing you will need to do is to draw your design onto the sides of your painted boxes.
Firstly decide how many floors you want to have. This will depend on the size of the boxes and the scale of your model if you are doing it to scale, as each row of windows will represent a floor in the building. You can have as little or as many windows as you like depending on how you want your skyscraper to look.
Using a ruler to add the details, first measure down either long side of the box and mark out the size of each window. you will need to make sure that both sides are marked out the same so as to give you a straight line when you join the two points together. You will then need to repeat this on the short sides as well.
Stage 5: Putting your Skyscraper together.
Once you have addedthe detail onto the sides of the boxes you are ready to reassemble them.
To do this you will first need to put a light coating of glue along the original tab at the edge of the box that you first separated at the start of this project to rejoin the sides together. Leave it to dry
Hint: Place an offcut of cardboard along the join and then place a ruler or pencil on top of the offcut, making sure that it sticks out from both ends of your box. Find a couple of heavy objects and rest them on each end of your ruler or pencil. This will help ensure that the two surfaces will stay together and help you to get a good join.
The next thing to do is to add the top or side pieces. For now, only add one end as you may need to reinforce the box.
To do this you will need to slightly bend the tabs up at one end of the box then place a light coating of glue on each of them. Place one of your top or side rectangles onto the tabs so that the side becomes flush with the box. Using a set square make sure that the box has perfect right angel's on its corners before leaving it to dry.
Hint: Place an offcut of cardboard on the tabletop or work surface and stand the box, with the side you have just glued, resting on the offcut. Place a book or similar weight on the other end of the box and leave it until the glue is dry. This will help ensure that you get a good join.
Reinforcing.
Depending on how big or how long your box is you may need to reinforce it to stop it from collapsing or twisting. So, before fixing the other end to the box you will first need to put a reinforcing piece inside of the box to add strength to the model skyscraper.
To do this you will first need to measure the inside of your box's sides, and then using your set square transfer the measurements to a piece of card.

Once you have done this add 1cm to each side of the sides to form the tabs A, that you will use to stick the insert inside of the box. Cut out the reinforcing insert and then gently score down each line of the tabs using the edge of the scissors. Try not to press too hard. You only need to mark the cardboard enough to enable you to bend the tabs.
Carefully bend each tab at right angles to the insert and then add the glue. It does not matter if you put a little too much glue on the tabs as the insert will need to be carefully placed inside of the box, so a little too much glue will aid in the process.
The next thing to do is to begin placing the insert inside the box.
To do this you will first need to make sure that the tabs are facing away from the open end from which you are working as this will make it easier to stick them down.
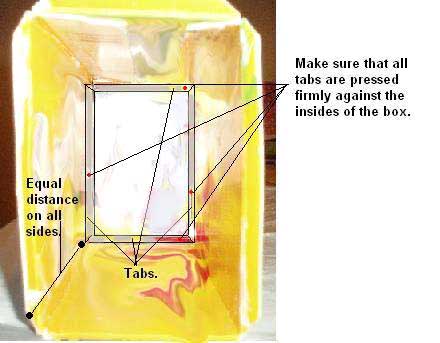
Next roughly judge the middle point of the inside of the box and then carefully begin to place the insert into the box. You will need to make sure that when it is fully inserted it has an equal distance from the edge of the box to each side of the insert. To do this I used a ruler and carefully tapped each side into place.
Only do this a little at a time as if you push one side too far into your box it will lose contact with the side of the box and you will be unable to fix it correctly.
To get the distance right I placed my thumb on the ruler at the depth that I wanted the insert to go and tapped each side a little at a time until my thumb touched the edge of the box on all sides. Once this is done use your ruler to press the tabs firmly to the sides and then get a small piece of sticky tape and stick each tab in place. The sticky tape will help to hold the insert in place until the glue has fully dried. In the event that you have managed to get any glue on the ruler, wash it off immediately with some warm water.
 Adding the insert.
Once this is done you can then fix the other end of your box in place. Again slightly bend the tabs up and then put a light coating of glue along the end tabs and carefully place the remaining end piece on the box making sure that it lines with the edge of the box and on each corner and leave it to dry.
Hint: Place an offcut of cardboard on your tabletop or work surface and stand the box with the side you have just glued, resting on the offcut. Place a book or similar weight on the other end of the box and leave it until the glue is dry. This will help ensure that you get a good join.
Once you have completed all your boxes you are now ready to assemble you model skyscraper. You will notice that I chose not to use the kitchen roll as it did not fit my design.