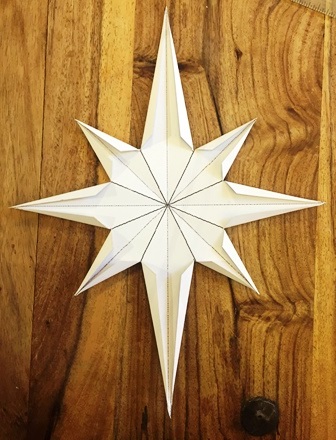
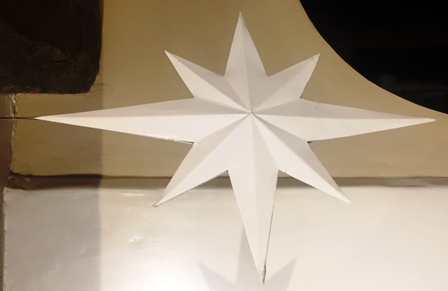
Star of Bethlehem Christmas decoration.
How to make a 3D Star of Bethlehem Christmas decoration.
Free 3D star of bethlehem template.

In this Christmas craft project, you will be making a 3D Star of Bethlehem Christmas decoration like the one shown in the picture. This is a great little festive project which requires the minimum amount of materials.
Using our free downloadable 3D Star of Bethlehem template will make it very easy and it would be an ideal Christmas decoration for the Christmas holidays.
To make your 3D Star of Bethlehem decoration you will need.
A craft knife or Scissors.
Silver craft card or plain card.
A Ruler.
Crayons or coloured pencils (optional)
pastels or paints (optional))
Glitter (optional)
A paint brush (if using paint)
PVA adhesive or craft glue
Small paint brush, Glue spreader or glue stick
Important: When printing make sure you print on the back of the craft card to avoid having visible lines on the finished decoration.
The first thing you will need to do is download each image into your chosen file. Next, open each image in your preferred editing suite, MS Paint or similar. Now scale the templates to your preferred size making sure that you scale both images the same. In this tutorial we will be using two plain sheets of A4 craft card so no scaling will be necessary. However before printing ensure you have a slight page margin to prevent any image clipping.
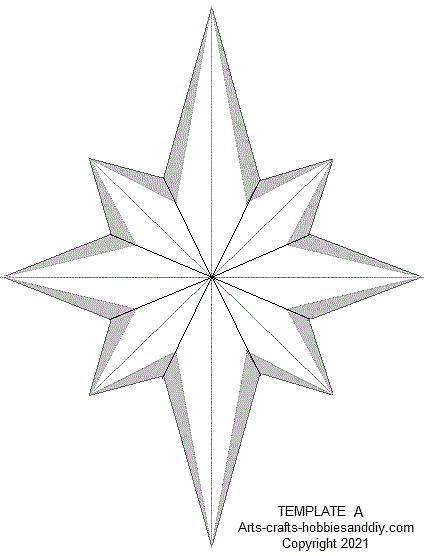
Click on the image to download it:
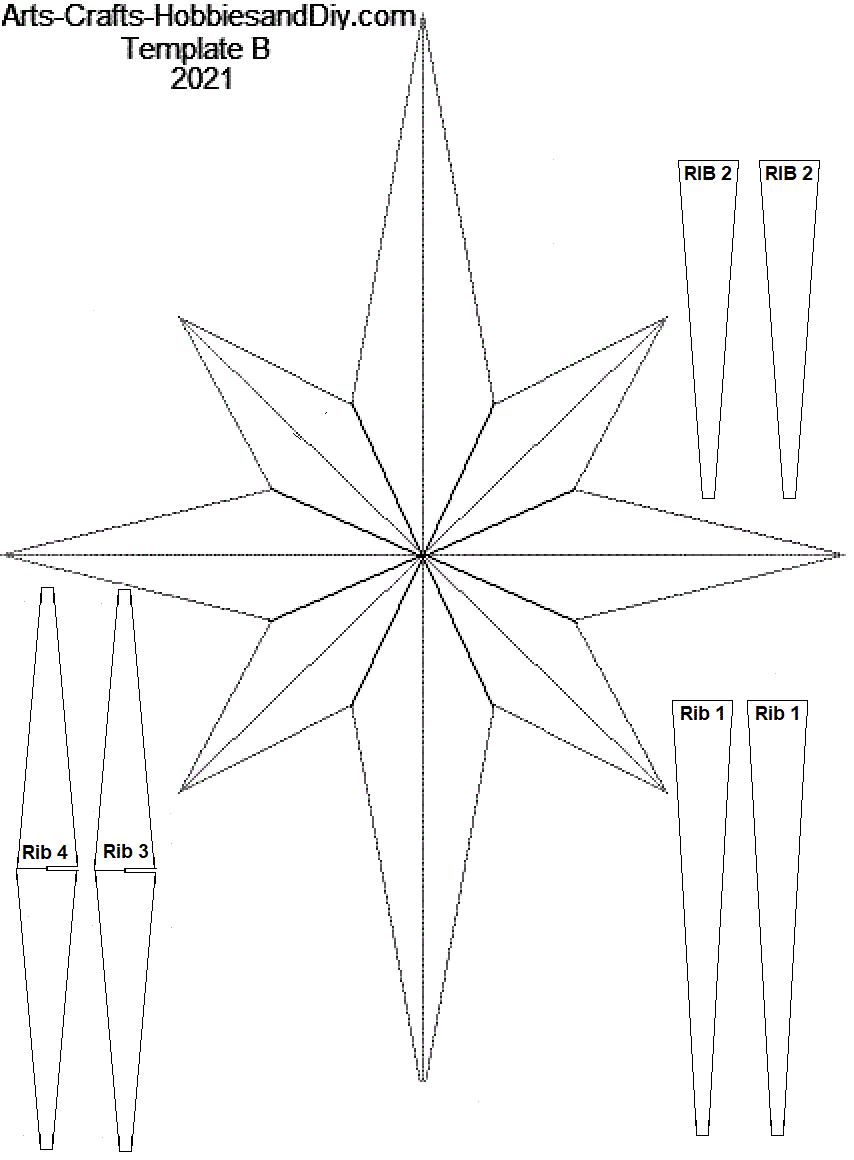
Click on the image to download it:
If you are unable to download or print off a template please first see How to draw a Star of Bethlehem. for instrutions on how to mark out and make your 3D Star of Bethlehem templates.
However if you would prefer to make a 2D star of Bethlehem hanging Christmas decoration please also see How to make a 2D star of Bethlehem
As mentioned previously, depending on the size of the star decoration you require the template can be scaled up or down accordingly. It should be noted however, that the smaller you make it the more fiddly it will be to assemble.
Cutting out.
Once you have printed off both sheet A and sheet B of the free 3d star of Bethlehem templates you will first need to cut out both stars and the reinforcing ribs. Reinforcing ribs 3 and 4 have slots in the middle that will need cutting out.
Note: Follow the lines carefully making sure that you do not cut off the fixing tabs on template A.
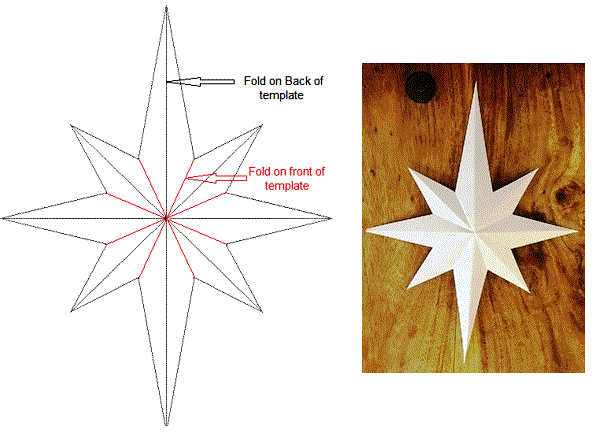
With your templates now cut out it is time to create the folds that will give the 3D effect. When making each fold make sure that the fold line, lines up with the the center of each point of the star. Important: Fold the lines according to the diagram shown. Fold all lines shown in black from the back of the template (printed side) and fold all lines shown in red from the front of the template (finished face). This helps create the 3D effect when the star's fully assembled.
The best way to accurately fold the templates is to place a straight edge along the fold lines and then using a ruler, set square or similar gently ease the card up until it is tight to the other straight edge. As shown in the next picture.
With both templates done carefully pinch each section to create a the 3D effect as shown in the picture above.
Bending fixing tabs on Template A.
First carefully snip between each tab on the lines between them. Next carefully bend each tab on template A as shown.
The best way to accurately bend the fixing tabs is to place a straight edge along the fold line of the tab and then using a ruler, set square or similar, carefully bend the tab. If you are having difficulty getting under the tab to bend it, us a craft knife to lift the edge at its widest point first. Then slide your chosen straight edge under the tab and bend tight to the edge of the other as shown. 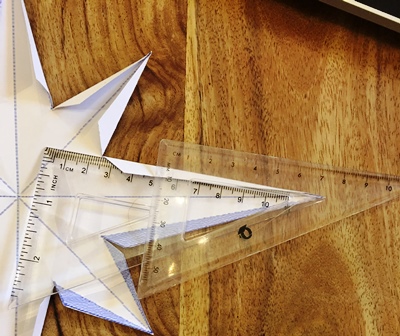
Once you have folded all the tabs on template A it is now time to assemble the templates.
How to make a Christmas decoration hanger.
 Before assembling first make a Christmas decoration hanger. To do this add a thin looped piece of cotton to the top of template B as shown. This will be used for hanging your Star of Bethlehem Christmas decoration. You can easily fix this by sticking a piece of card over the cotton thread to prevent it from being pulled out. Also apply a little adhesive along the cotton to centre it on the star decoration. This will also help keep it from being pulled out.
Adding reinforcing centre ribs.
If you are using thin card it would be wise to draw around each rib and make duplicates. These can then be stuck to each rib to reinforce it.
To prevent the 3D star of Bethlehem collapsing on itself when assembling it, you will need to put ribs in the centre of the star before fixing the tabs. This will help each point of the star hold it's shape and should prevent it from buckling or collapsing.
On Template B there are two complete ribs, ribs 3 and 4 and two pairs that each make up a full rib when fixed in place, ribs 1 and 2. These will need to be carefully cut out and glued to template B. They will need to be glued as shown.
Firstly slot ribs 3 and 4 together. Glue them in place on the four shortest points as shown. See Fig 1. 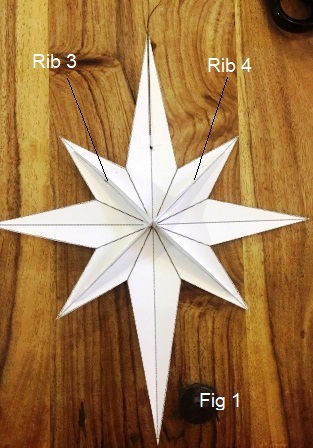
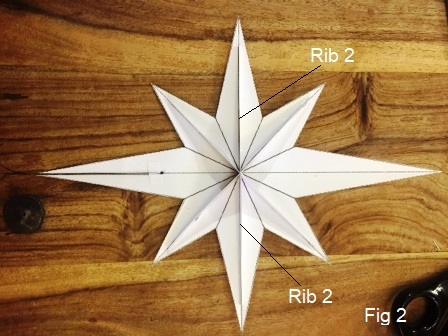
Secondly glue each rib marked Rib 2 on the next shortest points. Make sure you place some adhesive at the points where ribs 3 and 4 intersect. Fig 2.
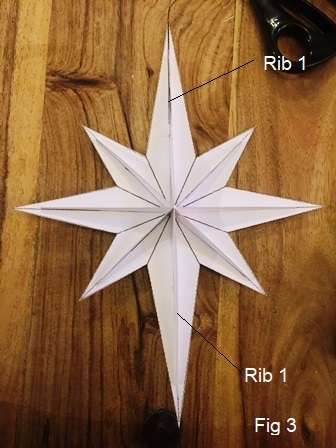
lastly, repeat the above process for the ribs marked Rib 1 on the longest points of the star. As shown. Fig 3.
You should now have all ribs fixed ready to support the eight individual points of the star as shown. Fig 4.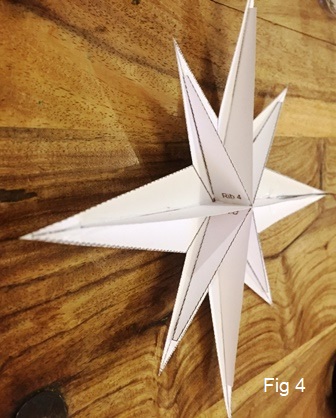
Assembling the 3D star decoration.
With all the tabs bent and the ribs in place on template B using a small paint brush or glue spreader, lightly apply a thin layer of adhesive to top edge of each rib on template B. Once that's done take Template A and place it onto template B. Carefully line up each rib and lightly run your finger along each point of the star to make sure they are located along the centre fold of each point.
Once located, hold them in place until they stick.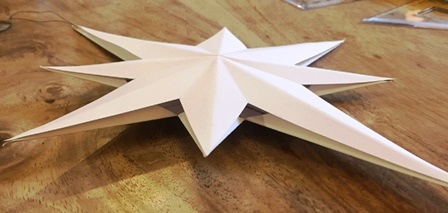 Leave the star to stick firmly before taking each tab, two at a time, on template A and applying a thin coat of adhesive. Try to keep the adhesive close to the edge. You will be applying adhesive to each corresponding tab in a V shape as shown.
 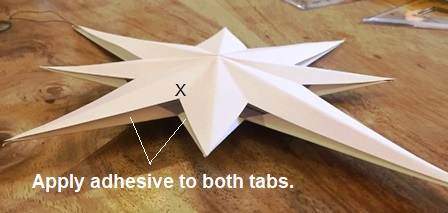 The reason for this is that when the tabs are held at point X as shown both tabs will come together. Important: Do not apply to much pressure as this may buckle the star. Carefully stick them to the template B. You may need to lightly pinch each edge to make full contact. Hold each tab in place until it has stuck firmly.
Decoration.
Once all tabs become secured in place leave it to dry before applying any finishes.
Depending on whether you used silver craft card or plain card it is now time to decorate your star. This can be done using Coloured pencils, Craft paper, Paint or Glitter.
To decorate my star I first applied a thin layer of PVA adhesive to one side of the star and then lightly sprinkled Silver glitter onto it. Then allow to dry before lifting it up and letting any loose glitter fall of. Now repeat the process on the other side. As I have shown in the first picture at the start of this tutorial.
How to make a 2D Star of Bethlehem.
If you were looking to make a flat 2D Star of Bethlehem follow the instructions above for Template B.
Simply cut out template B and either fold it, as shown or leave it flat.
If you drew it on silver craft card all you need to do is attach a looped piece of cotton to the back of your 2D Star of Bethlehem using sticky tape or adhesive and it is ready to hang. Alternatively you can decorate the free 2D star of Bethlehem template using Glitter, Coloured pencils, craft paper or paint.