Drawing hair and eyes.
How to draw hair and eyes.
Step 3:
When Drawing portraits, hair and Eyes are the next thing I like to add.
It is now time to start building the picture. When building the picture I always like to start at the top and work my way down. I find by doing this it helps to avoid accidental smudging of the portrait.
I am right handed so I like to start at the top left of the portrait. Starting at the top left means I can work my way across and down the portrait. This allows me to add and extend the features and some details as I go. I only add basic detail as I prefer to refine the features and details on completion of the portrait.
How to avoid smudging your drawing.
A popular way to avoid smudging artwork is to place a piece of paper on your sketch. This will act as a barrier between your hand and your picture allowing you to rest your hand on the drawing as you work. It also stops any transference of oils or dirt from the skin which can damage the picture.
Drawing hair and eyes: How to draw hair:
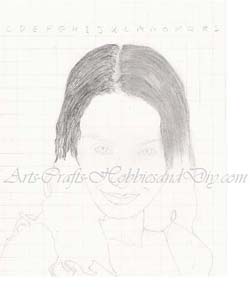
 Study your picture to see where the darker areas of hair are. Then using the grid locate the positions and add these areas to your portrait. Work only as far as the eye line on your portrait as the eyes will be your next feature.
I prefer to start building the hair with a 3B or 4B pencil. This allows me to add both darker and slightly lighter areas of the hair without having to change pencils. If I need to add even darker or lighter patch's I prefer to do this on completion and will discuss these techniques nearer the end of this tutorial. I prefer to add the hair in single strokes using a loose shading motion roughly following the line of the hair and building each darker and lighter area as it appears in the original picture but you can adapt your own style if you prefer. Some artists prefer to work in blocks and pick the detail out later with an eraser pen which I will discuss later.
Blending.
Tip 3: For blending your portrait you can use standard cotton wool, a cotton bud, Q-tip or artists blending stumps and tortillons which you can purchase from this page. Some artists also use other items such as tissue, cloth, and even their finger but this is not advisable as the natural oils and grease on the skin can mark the paper and prevent the tones from blending properly.
Once I am satisfied with the basic look of the hair I then use a small cotton wall ball to blend each section of the hair and take the sharpness off the image giving the hair a softer more natural look as shown on the right side of the portrait in the example to above.
Smudging the graphite.
If you smudge graphite past the outside edge of the portrait it can all be cleaned up with an eraser on completion of the work.
How to draw the Eyes.
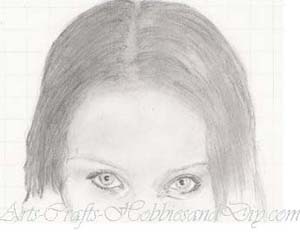
 Again study your picture paying attention to the grid and where each line crosses and where the darker areas are. Using a 3B or 4B pencil carefully begin to add them in. These always tend to be across the eyelids and the pupil. Do not add the eyelashes as you will first need to build the eyelids.
How to add light and dark areas to the eyes.
For the eyelids and around the eye I used varying pencil pressures to add the light and darker patches and then blended them with a blending stump. I then moved on to the pupil.
How to draw a pupil.
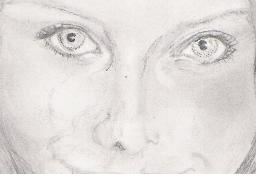
When adding the pupil, allow for reflection as this is what brings the eyes to life. When doing the pupil I tend to try to work in a C shape depending on which direction the light is coming from. This ensures that I leave a small area untouched which gives the eye the appearance that it is looking out of the page at you.
Drawing hair and eyes: How to draw an Iris.
Once you have finished the pupil you can move onto the iris which surrounds the pupil.
It is important to study the Iris as it is seldom a block of one colour and tends to have varying details of light and shade. It is also very important that you take your time. For the Iris,
To draw the iris I used a 4B pencil and lightly filled the area using gentle pressure. Do not press too hard with your pencil or you may make the iris too dark.
Take your time and slowly build the iris paying attention at all times to the different shades. I prefer to study the iris and then lightly shade in the direction of the details I see. If you make a mistake gently erase it with a soft eraser and start again.
The importance of getting the eyes correct when drawing.
Not getting the eyes correct will affect the whole picture making it look wrong. Once you have completed the eye gently blend the shades together taking care not to smudge the eyeball to much. If you do accidentally smudge the eye too much use the hint below to tidy it up.
Tip 4, Custom made eraser: Get a normal soft rectangular eraser of about 20mm x 10mm and lay it on its widest side on a hard surface such as a cutting board or hard placemat. Do not do it on a table, desktop or worktop. Using a sharp knife cut a 10mm slice off of the longest side making sure that you cut all the way through the eraser. Once you have your rectangular 10mm piece lay it flat on its thickest side. Again using the sharp knife, cut it from one corner to the opposite corner so as to form a triangle. With this done you should now have a handy eraser for removing small details and altering incorrect lines.
How to draw the Forehead.
 You will notice also that I have lightly shaded the forehead. To do this I used a 3B pencil. Firstly I gently rubbed out the grid lines so as to make sure that they would not show through the shading as I will only be using light shading toward the centre of the forehead. Be careful not to erase the initial eyebrow detail when doing this. I then shaded around the hairline as this always tends to be slightly darker than the rest of the face.
To do this I started just above the eye and shaded using a small circular motion. Worked around the hairline paying attention to the original picture. Once I was happy with the basic shape of the shading I used my cotton wool to carefully blend the shadow out from the hairline and across the forehead.
Drawing hair and eyes: Adding eyebrows to a portrait.
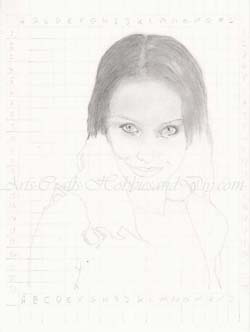
Once the eyes were complete and I had finished blending the forehead I then added the eyebrows. With a sharp 3B pencil use small short strokes to form the hairs of the eyebrow paying attention to the darker and lighter patches. Next, gently blend them taking care not to completely smudge the detail.

As you can now see our portrait outline is beginning to take on the appearance of our subject so it is now time to move on down the face to the cheeks, nose, and mouth.