How to draw a Star of David.
 The star of David, Magen David.
How to draw a six pointed Star.
Free star of David drawing tutorial.
Drawing a Star of David.
For this simple tutorial on How to draw a Star of David you will first need to take a sheet of craft card or paper and find its center. Finding it's center can easily be done by drawing a straight line from corner to corner as shown. Note: It is not essential to draw the line completely from corner to corner as you only need to mark the center.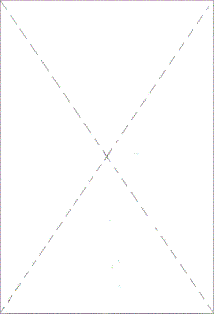
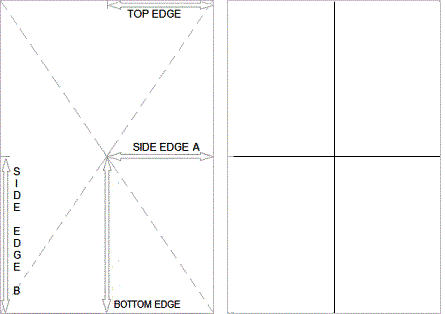 Next, Divide the page into four equal parts as shown above. To divide the sheet into four equal parts. Firstly measure from the side edge A of the sheet to the centre point. Now transfer the measurment to the top edge of the sheet as shown. With that done, now measure from the center point to the Bottom edge. Transfer the measurement to the side edge B then place a ruler on each corresponding point and draw a line the full length of the sheet making a cross.
Forming the center of the Star of David. (Magen David)

Now take a compass set at approx 45mm and draw a circle using the center point on the card as the center point of the circle. It is important that you do not make the circle too big as the Star may not fit on the page.
Once you have drawn the circle you will now need to draw a larger circle around it as shown. This can be done by again leaving the compass set at the radius of the circle and then marking from the edge of the inner circle out onto the dividing lines as shown. Set the compass to the 90mm (45mm + 45mm) and draw the larger circle.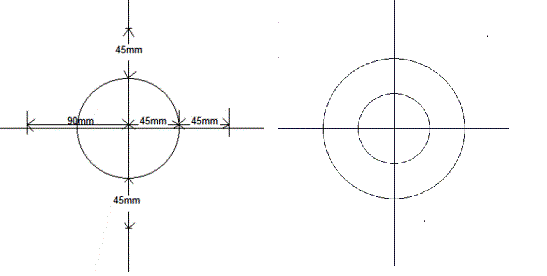
Note: If you want to draw a larger or smaller star you will need to scale the measurements accordingly. For example to create an A3 sized star you will need to double all measurements shown.
Creating the six points of the Shield of David.

Next, with your compass set at the radius of the inner circle (45mm) place it near the edge of the page on the line dividing the page in half horizontally and make a mark. Mark the page both above and below the line. Then take a ruler and draw a line from the marks across the top edge of the inner circle first and then repeat on the bottom edge of the inner circle as shown below.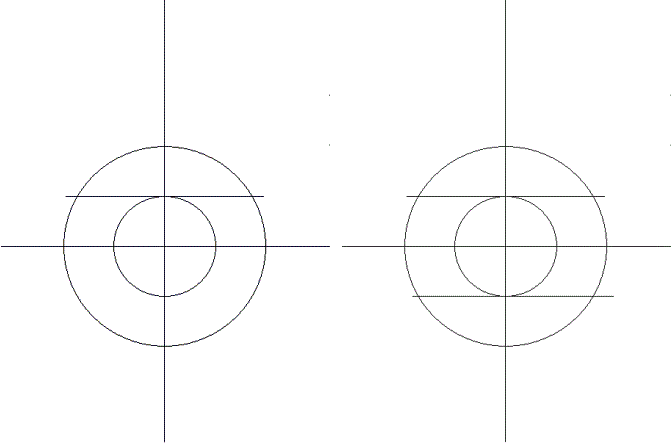
How to draw a six pointed star.
Now take a ruler and join the points marked 1 as shown. 
Repeat the process for points marked 2. 
You should now have six points to your star of David that should look like the image shown.
Adding an outer edge of the star.
With the first inner part of the Star of David complete, now mark out the outer edge. First take a ruler and draw a line through each point of the star making sure that it intersects with the center as shown. 
With that done, take a compass and set it from the center point of the inner circle to where the edge of the inner star intersects with the horizontal page line and the star points cross.
Next place the compass on the intersection point and mark the horizontal line as shown transerfering the measurement of 51mm in this case, at point A to point B 51mm as shown, or 102mm from the center point of the inner circle. Now set the compass from the center of the inner circle to point B and draw another larger circle as shown.
With that done take a ruler and draw a line from each intersection point marked C. 
Now carefully erase all setting out lines to leave only the completed Six pointed Magen David as can be seen below.

How to make a 3D star of David.
If you are using this tutorial in conjunction with our Tutorial on How to make a 3D star of David You will need to make another template by repeating the above stages again before moving on to adding fixing tabs as shown below.
With the first template now drawn which we will call Template B. You will need to make a second identical template, Template A to which you will need to add fixing tabs. These will allow the two finished templates to be stuck together to form the 3D star. It is important that you keep all measurements used to make templte B identical for template A.
How to Add fixing tabs to a 3D Star.
With the second template drawn, Template A You will now need to add the fixing tabs. To add the tabs you will need to divide template A up again.
To do this, draw a line from the center point through each intersection point where the lines of each of the star bodies cross, as shown. These will form the highest point of the fixing tabs and also provide a guide line for when the tabs are cut.
With the lines drawn, now measure approx 10mm from the intersection point up each line as shown below in red. 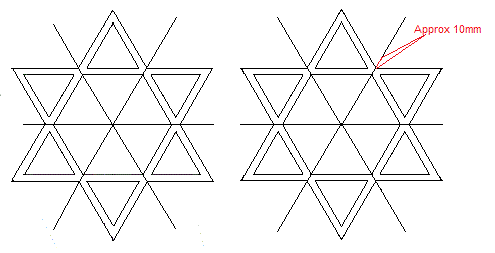
Once completed, draw a line from the 10mm mark to the tip of each point of the star as shown to form the lowest point of the fixing tab.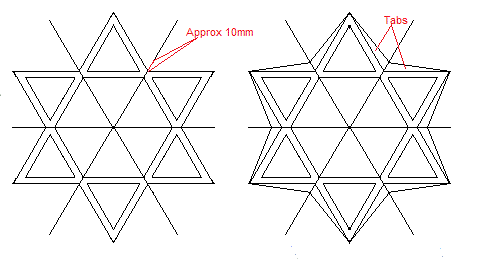
Once you have completed both templates you are now ready to cut them out as described in How to make a 3D Star of David, Cutting out.
Reinforcing ribs.
To reinforce the star you will need to add reinforcing ribs.
How to draw ribs.
Firstly draw a center line C and an intersection line I then measure 15mm either side of the intersection line to form the widest point of each rib.

At it's widest point the rib will be 30mm as shown.
Next measure the length of each rib as shown and mark a point 85mm either side of the intersection line. The rib at it's narrowist point will be 2mm so at the point you just marked measure 1mm either side of the line shown. 
Now draw a line from the widest point to the narrowist point as shown to form the shape of the rib. Note: You will need to draw three ribs. Also If you have made a smaller or larger template you will need to the scale the ribs the same as your templates.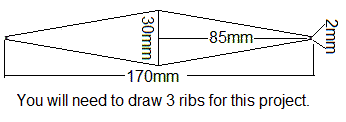
With both templates A and B now drawn and the ribs drawn you can now visit our free tutorial on How to make a Star of David by using the link below.