How to draw a star of Bethlehem.
How to draw an eight pointed Star of Bethlehem.
Free star of bethlehem drawing tutorial.
Drawing a Star of Bethlehem.
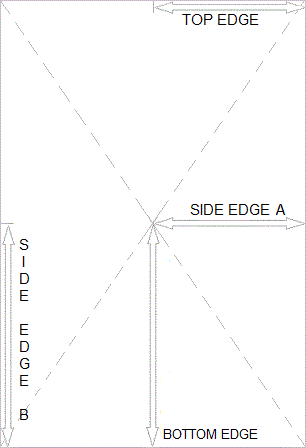
Template B.
Important: Make sure you do all setting out on the back of the craft card to avoid having visible lines on the finished decoration.
First take a sheet of craft card or paper and find its center. To find it's center draw a straight line from corner to corner as shown. Note: It is not essential to draw the line completely from corner to corner as you only need to mark the center.
With that done you now need to divide the sheet into four equal parts. Firstly measure from the side edge A of the sheet to the centre point, then transfer the measurment to the top edge of the sheet as shown. Next measure from the center point to the Bottom edge. Then transfer the measurement to the side edge B. Next place a ruler on each corresponding point and draw a line the full length of the sheet making a cross.
Forming the center of the Star of Bethlehem.
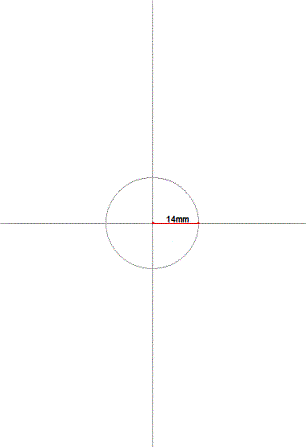
Next, take a compass set at approx 14mm and draw a circle using the center point on the card as the center point of the circle. It is important that you do not make the circle too big as the Star of Bethlehem will look out of proportion.
Once you have drawn the circle you will have four equal segments as shown.
Note: If you want to draw a larger or smaller star you will need to scale the measurements accordingly. For example to create an A3 sized star you will need to doulble all measurements shown.
Creating the first four points of the Bethlehem Star.
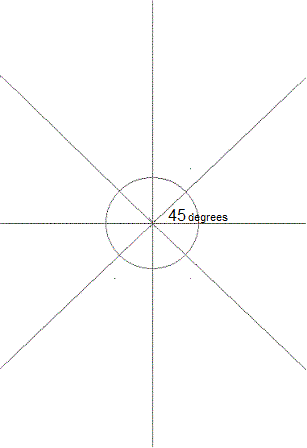
Each segment will now need to be divided in half again to give eight equal parts as can be seen below.
To do this, take a protractor and place it on each right angle and mark off 45° for each section as shown. Using a ruler draw a line through each point to create the four points of the center star.
Setting out the four points of the center star.
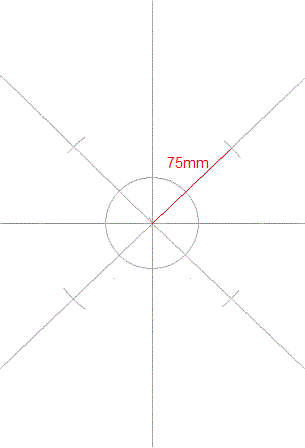
Next take your compass and set it to 75mm. Now place it on the centre point and mark each 45° line. With that done take a ruler and draw a line from where each point of the circle intersects the cross that divides the sheet into four. As can be seen below. You should now have a four pointed star. 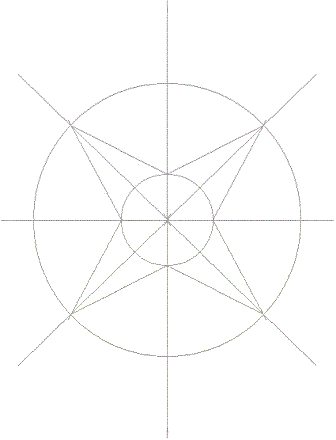
How to draw a six pointed star.
With the first four points of the star now drawn it is time to add some more. Next take the compass and set it at 95mm and make a mark on the left and right side of the middle center line as shown. 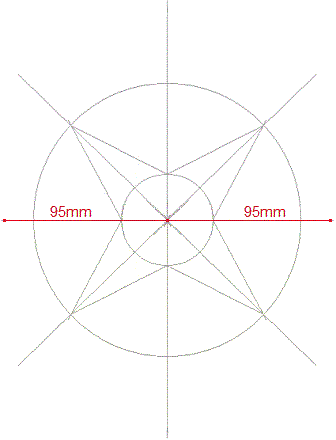
Next take your ruler and draw a line from your mark to each intersection point on the circle as shown. 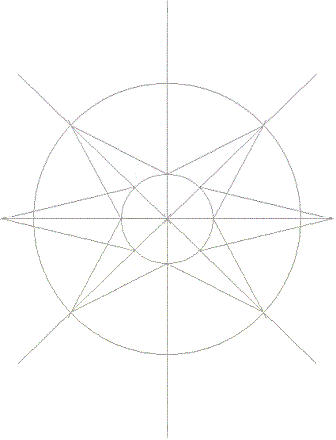
You should now have six points to your star of Bethlehem that should look like the image shown.
How to draw an eight pointed star.
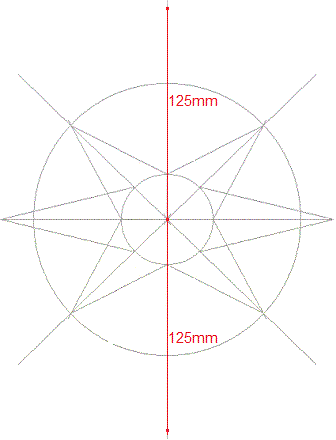
With six points to the star drawn, it is now time to add the top and bottom points to the star of Bethlehem. To do this set your compass to 125mm and make a mark on the top and bottom of the center dividing line as shown.
Join these points as with both the four and six pointed star to form the Star of Bethlehem.
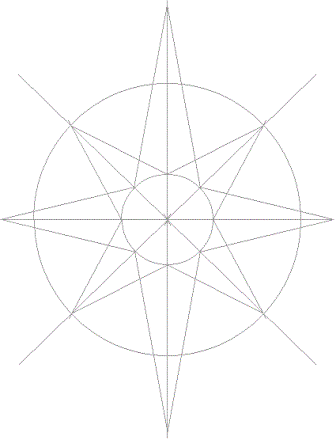
The star of Bethlehem should now have eight points as can be seen in the image.
Building a 3D star of Bethlehem.
With the first template now drawn. Template B you will need to make a second identical template, Template A to which you will need to add fixing tabs. These will allow the two finished templates to be stuck together to form the 3D star.
Adding fixing tabs to a 3D Star of Bethlehem.
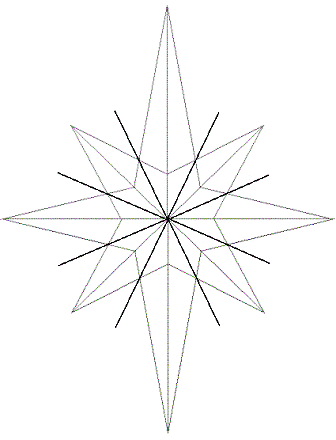 With the second template drawn, Template A You will now need to add the fixing tabs. To add the tabs you will need to divide template A up again. To do this, draw a line from the center point through each intersection point where the lines of each of the star bodies cross, as shown in black. These will form the highest point of the fixing tabs.
With the lines drawn, now measure approx 10mm from the intersection point up each line as shown below in red. 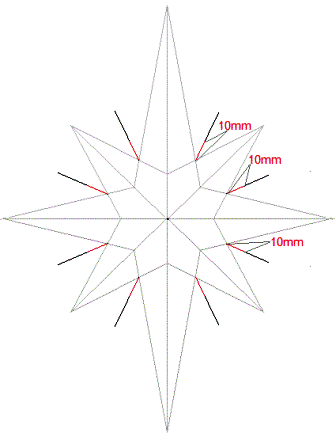
Once completed, draw a line from the 10mm mark to the tip of each point of the star to form the lowest point of the fixing tab. Once completed template A should resemble the example shown below with the tabs highlighted in grey.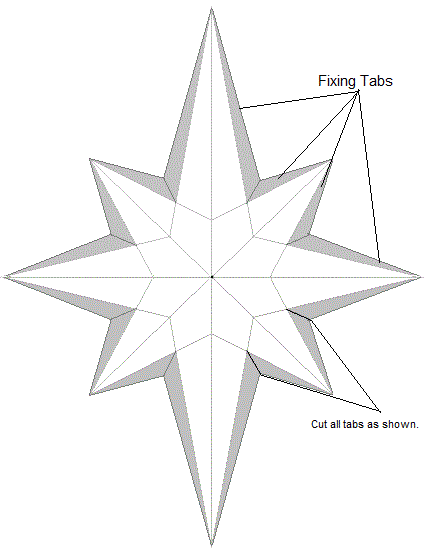
Once you have completed both templates you are now ready to cut them out as described How to make a 3D Star of Bethlehem Christmas decoration, Cutting out.
Reinforcing ribs.
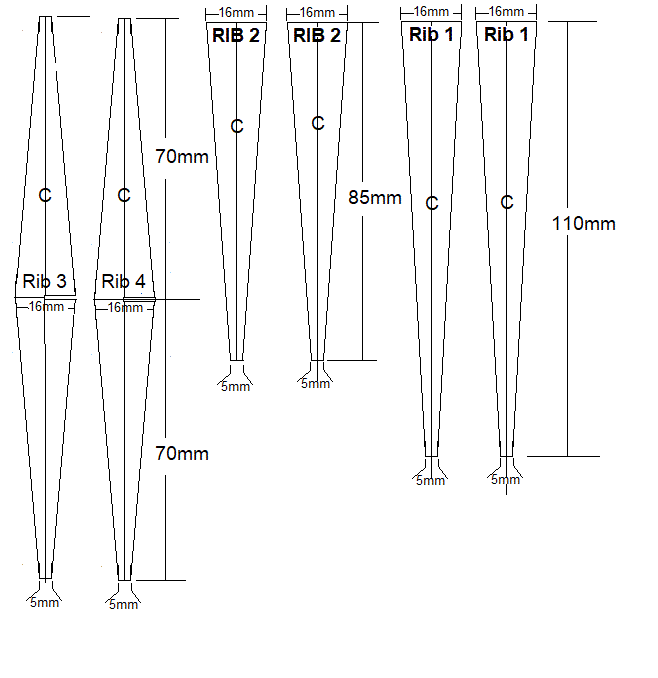
To reinforce your star of bethlehem you will need to add reinforcing ribs.
Draw each rib a shown in the picture. Draw a center line C and measure 8mm either side to form to top of each rib. The top is 16mm wide as shown. Next measure the length of each rib as shown and draw a bottom line 2.5mm either side. The bottom of each rib is 5mm as shown. Now connect each point to form the rib. Note: Rib 3 and Rib 4 are one complete piece unlike ribs 1 and 2 that are made up of two separate pieces. Also they have a slot cut into them to allow for them to be fixed together. If you are using thin card it may be wise to draw four of each rib which will allow you to stick then together for extra strength. Note: If you have made a smaller or larger template you will need to the scale the ribs the same as your templates.